This article was authored by Max S. Haberman, Technical Support Associate at Dobility.
Form design can be a tricky process, especially when you’re collaborating with colleagues. With Google Sheets, you can easily design forms from templates, collaborate remotely, and then validate them before uploading them to SurveyCTO for collecting data.
Save time with form definition templates
If you create your form from the SurveyCTO server console, it will create a form design spreadsheet template that auto-styles fields for you. For example, take a look at this form definition created from scratch:

That’s not bad, but all of the column headers and sheets have to be added manually, and it would be nice if there was some styling so it was easier to tell each field’s type at a glance.
Take a look at this form definition created using a SurveyCTO form definition template:
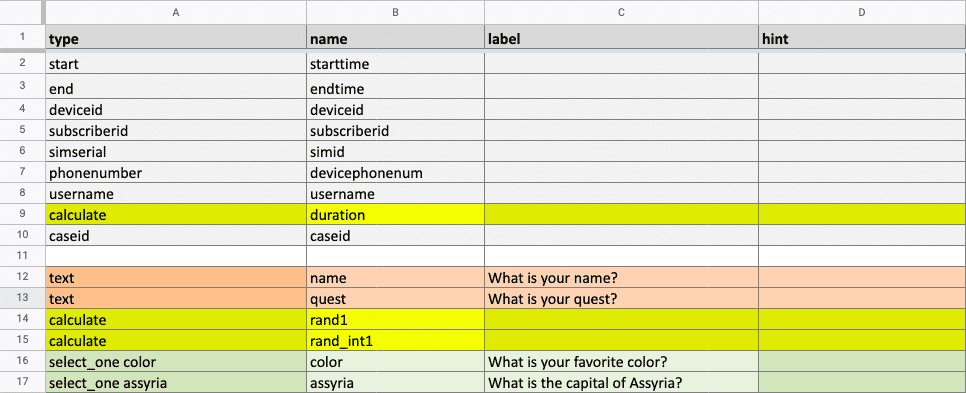
These are some of the benefits of using a form definition template:
- Fields are automatically styled based on type
- Field properties are added for you
- All needed sheets are included (survey, choices, and settings).
- Metadata fields that can help during data analysis are automatically generated. Versions are automatically numbered based on the current time and date
- And lots more
Not only is the form definition nicer to look at, but each column header is clear, and you can identify fields more easily. If you were looking for a certain select_one field, you only have to look at the light-turquoise fields to find the field you need. When quickly searching through the form, you will know to skip the top several fields, since they are gray, meaning they are metadata fields that you don’t need to change.
Creating a new form definition
There are three places to work on form definitions: the online form designer, an XLSX spreadsheet application (such as Excel), and Google Sheets. If you are a beginner, we recommend starting in the online form designer, and you can check out our quick start guide for a visual guide on how to get started.
Working in a spreadsheet, such as in Excel or Google Sheets, is great because you can easily view the details of multiple fields at once, and quickly jump between them to make changes.
To create a new form definition template for Google Sheets, follow these steps:
- On the Design tab, click a plus + on the right.
- Click Start new form.
- Enter a form title (the form ID will be generated automatically, but you can also change it here), then click Next.
- Turn Advanced download options to ON.
- Click Download to Google Drive.
- Sign in if prompted.
- Click on the link in blue to open the form definition spreadsheet in Google Sheets.
You can also copy another form, changing the form title and ID on the settings sheet. See below for more details.
Copy fields from other forms
Lots of organizations focus on a specific kind of project, such as farming surveys, water sanity checks, and lots of other wonderful services. Because of this, many of your forms may use a lot of the same fields. Instead of creating a new form from scratch each time, you can copy fields from a previous form, and paste them into a new form to save time. You can even just make a copy of a previous form, and change the copy based on the needs of the new round of data collection.

Personally, whenever I want to create a new spreadsheet form definition, I open a form design template I have saved, make a copy, and change the form title and ID of that form. This can be faster than creating it from the server each time.
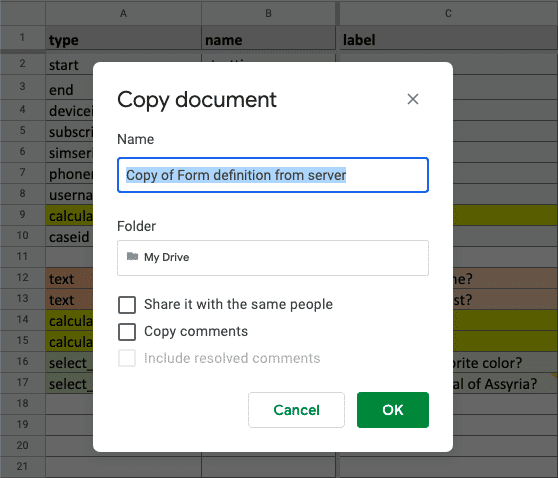
You can also work off of forms that others have created. Talk to your colleagues, and other organizations, and ask if they already have forms that collect the data you need, so you can start from a strong base. You can also search our support center to see if we have any samples you can use, or post in the forums to ask the SurveyCTO community.
Reorder fields
Let’s say you have a wonderful field set up, but you would like for it to be completed somewhere else in the form, In Google Sheets, you can easily drag-and-drop to move rows, and therefore move fields. To do so, select the field row by clicking the number on the left, then click-and-hold that number, and drag it to the desired position.

Validate your form in Google Sheets with the SurveyCTO validator add-on
When you upload your form to the server, it is validated before it is deployed to be used by data collectors. The validator ensures there are no technical mistakes, such as all quotation marks and parentheses come in pairs, all field references are to fields that exist, etc. You can validate your form right in Google Sheets using our add-on. That way, you don’t have to upload your form to the server to make sure everything is correct. It will even show multiple errors at once!
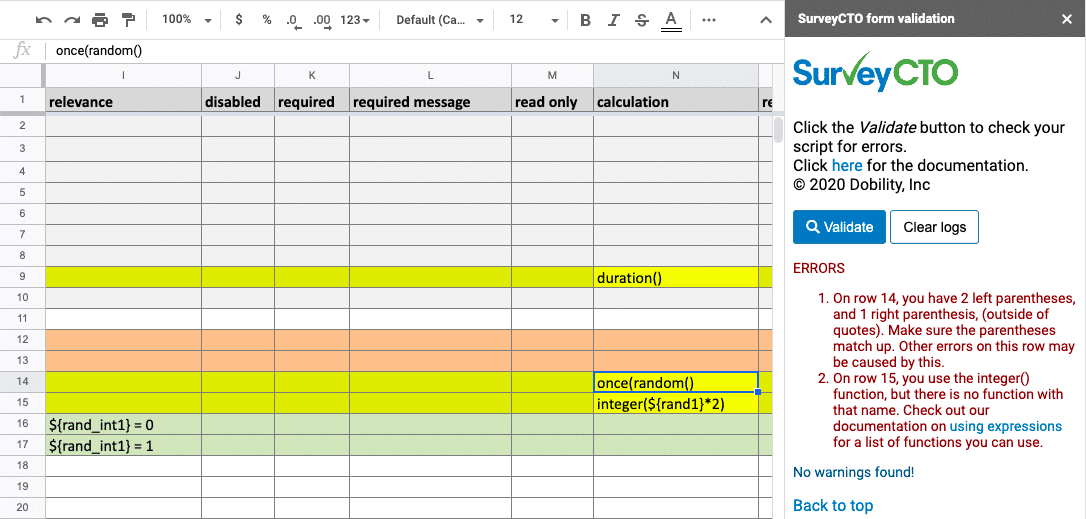
The add-on does not perform all of the same checks as the server validator, but it will perform checks the server validator does not. For a full list of checks, check out the repository. To learn more about this add-on, including how to set it up, check out this support article.
Collaborate on forms with colleagues
One of the greatest advantages of creating your forms in Google Sheets is its collaboration features. You can start a form, leave for the day, and then your colleagues in a different time zone can continue where you left off. Even if your colleagues are in the same room, Google Sheets is a great way for everyone to view the latest changes without needing to crowd around the same computer.
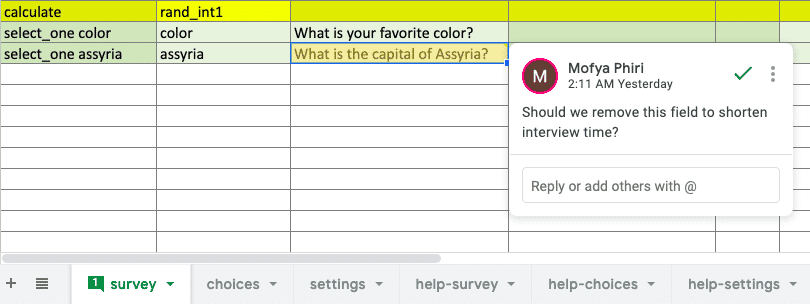
Google Sheets is especially useful when the form design is going to be uploaded in different time zones. When the form version is based on the time, form designers in different time zones could have different form version numbers. You can learn more in our form version troubleshooting article, section Working with colleagues across different time zones. With Google Sheets, working in different time zones is not a problem, since Sheets always uses the same time zone for the spreadsheet, no matter where in the world you’re working on it.
Automatically back up your form design and revert to previous versions
Google Sheets automatically saves your spreadsheet form design as you work on it to the cloud. That way, if there is an issue with your computer at any point, or you forget to save, don’t worry, since everything is still in Google Sheets!
Plus, Google Sheets allows you to recover older versions of a form. If you replace an expression in a form to the point where it is no longer working, and you want to revert back the older version, go to File > Version history > See version history, and you can view older versions of the form. You can revert back the entire form, but you can also just copy what you need, and paste it into the latest form version.
Freeze rows and columns
You can freeze rows and columns so when you scroll down or to the right, you can still see important field properties. For example, in the below screenshot, the top row and the left-two columns are frozen:

That way, no matter how far you scroll, the top row will always be visible, and the left-two columns will also always be visible. In the above example, we can more easily change the calculations for the fields “rand1” and “rand_int1”, since even though we have scrolled down and to the right, we can still easily see which field and property we are changing without having to scroll back.
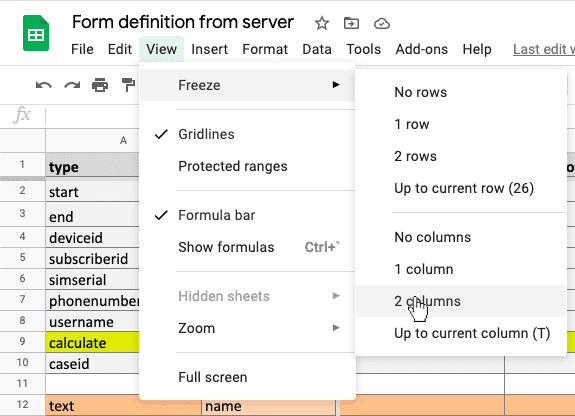
To freeze in Google Sheets, on the top, go to View > Freeze, and select how many rows and columns you would like to freeze.
When you are ready…
Here are some tests you can do to try what you have learned:
- Make a copy of this form definition, and save it to your own Google Drive.
- Use the steps you learned in Reorder fields above to have the field “quest” be the first visible field instead of “name”.
- Add a new integer-type field with the name “age” with the label “What is your age?”
- Share your form with a colleague, and then have them add new fields. You will be able to see the new changes almost immediately.
- In that new field “age”, purposefully add a function that does not exist to the by giving it the relevance expression:
select-choice(${color}, '1')
Then, follow the steps to install and use the SurveyCTO Google Sheets form validator. When you run the validator, it will detect that error. (To learn about the functions you can use, such as the real selected() function, check out our documentation on using expressions.)
We have barely grazed the surface of what you can do in Google Sheets form designs, let alone SurveyCTO. Feel free to explore our support center for more tips, tricks, and guides.
If you have never used SurveyCTO before, you can sign up for a free 15-day trial. If you run into trouble, trial and paid users can reach out to SurveyCTO support for fast, professional support, 24×7, and all users can post to the user forums.


